

Anyone who understands the anchoring principle of back bolts knows that the hole for a back bolt is wedge-shaped, similar to a vase: a small straight hole and a large undercut are needed to anchor the panel durably and effectively.
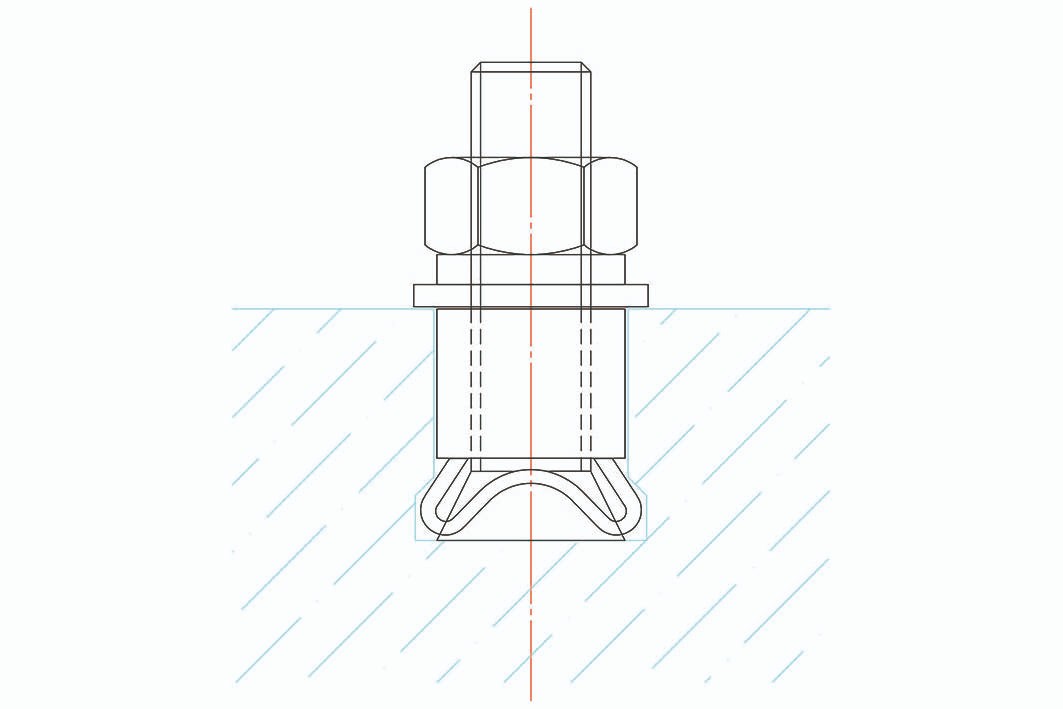
Figure 1. Diagram of hammer-in back bolt installation
As shown above, once the back bolt's expansion ring (segment) expands, the expansion segment at the bottom wraps around the countersunk head of the threaded rod, increasing the overall outside diameter at the bottom so that it exactly matches the undercut of the wedge-shaped hole; after the flat washer, spring washer, and nut are locked in place, an effective anchorage is formed. However, once a back bolt hole has been drilled, it is difficult to see the inside of the hole clearly with the naked eye. How can you determine whether the drilling is acceptable?
To measure whether the drilling is acceptable, you need to understand the configuration of the back bolt hole. As shown in Figure 2, it mainly consists of four parts: the straight-hole fit dimension, the undercut fit dimension (height), the depth fit dimension, and the undercut fit dimension (diameter). The straight-hole fit dimension and depth fit dimension are checked with the hole gauge rod, while the undercut fit dimension (height) and undercut fit dimension (diameter) are checked with the hole gauge.
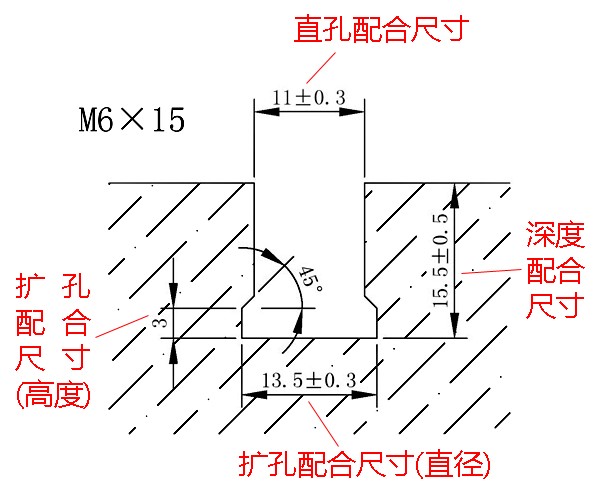
Figure 2. Diagram of back bolt hole dimensions
Straight-hole inspection tool — hole gauge rod
The hole gauge rod can be used to check the straight-hole diameter (straight-hole fit dimension) and hole depth (depth fit dimension). As shown in Figure 3, the hole gauge rod has a large-diameter end and a small-diameter end, with a depth line on the small-diameter end (the depth line is 1 mm high). Its steps of use are as follows:
1) Match the large-diameter end against the drilled back bolt hole; if it can be inserted, the straight-hole diameter is too large and the hole must be corrected;
2) If the large-diameter end cannot be inserted into the back bolt hole, then match the small-diameter end against the hole; if it cannot be inserted either, the straight-hole diameter is too small and the hole must be corrected;
3) If the small-diameter end can be inserted into the back bolt hole, insert the gauge rod all the way in. If the depth line is flush with the panel face, both the straight-hole diameter and the hole depth are acceptable; if the depth line is not flush with the panel face (it protrudes beyond the face or sinks into the face so that the line is not visible), the hole depth is unacceptable (protruding means the hole is too shallow, sinking means it is too deep) and the hole must be corrected.
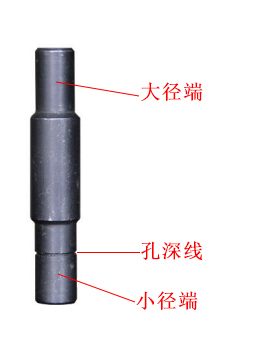
Figure 3. Hole gauge rod
Undercut inspection tool — hole gauge
The hole gauge can be used to check the undercut fit dimension (diameter) and the undercut fit dimension (height). As shown in Figure 4, the parts of the hole gauge that perform the inspection are the push rod and the expansion segments; before measurement, the push rod is not fully pushed in and the expansion segments are not expanded. Its use is also very simple: place the hole gauge directly into the hole and press the push rod downward. If the expansion segments can expand (in practice, a clicking sound is heard after the push rod is pressed down), pull the gauge upward; if it cannot be pulled out, this proves that the undercut fit dimension (diameter) and undercut fit dimension (height) are acceptable. If the expansion segments cannot expand (in practice, there is no movement after the push rod is pressed down), the undercut is unacceptable and the hole must be corrected.
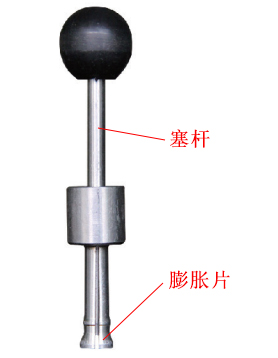
Figure 4. Hole gauge
Self-inspection and supervision are important
Above we learned how to measure back bolt holes, but hole measurement itself is a thankless task, and installers often do not think of performing this check. Project managers must understand the importance of the overall safety performance of the curtain wall and require installers to measure the holes. Generally, one inspection is required for every 30–50 holes; if a defective hole is found, other holes drilled at about the same time must also be checked, and any unacceptable hole must be corrected promptly.
In addition, the supervisor also plays a vital role throughout the project. Multiple inspections can better safeguard the safety of the curtain wall. Daring prefers to work with responsible companies.